CLICK HERE FOR FREE BLOGGER TEMPLATES, LINK BUTTONS AND MORE! »

Sunday, March 18, 2012

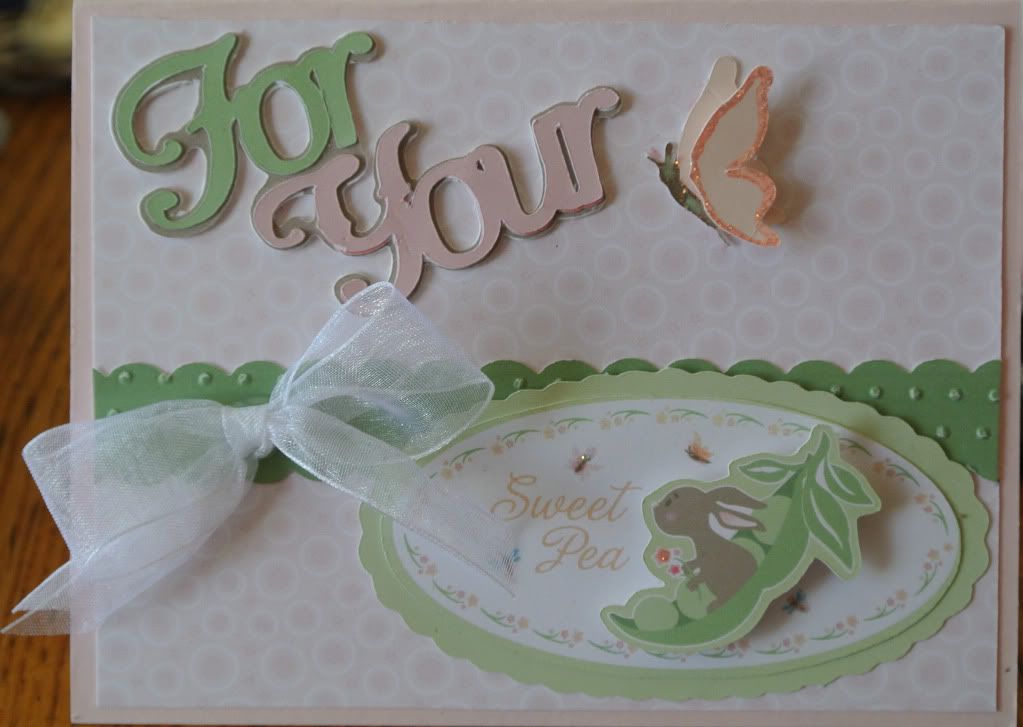
Sweet Pea baby card

This card was made with my Imagine & Cricut Craft Room.


The patterned paper,  Sweet Pea tag and all flood filled colors are from Nursery Tails. I flood-filled a 5.5 X 4.5 rectangle with the patterned image and then cut it down to 4 X 5. This was glued on to the front of a pink 4.5 x 5.5 card.

 The tag is cut at 2". To get the layering, I placed 2 of the tags on the mat. Using the edit feature, I separated them into layers. On one of the tags, I deleted the green oval and the bunny. After that I re-combined the remaining layers. The other tag I cut out all the pieces and discarded all but the bunny and green oval as for some reason I couldn't get the bunny to cut out right if I didn't. Glue the "sweet pea" oval on top of the green oval and attach bunny with a pop dot. I put a little bit of icicle stickles on the butterflies and center of the flowers.
 
"For Your" was done with the font from Elegant Cakes cut at 2". I welded the shadow and filled it with a brown . I also cut the shadow out of chipboard. "For" was filled with a green and ""Your" was filled with a pink . The shadow layer was glued onto the chipboard and the "For " and "Yours" on top of that.

For the single butterfly, I used Kates ABC's. It was cut at 1" I cut 1 body and 2 wings. The body was filled with brown and the wings with peach. I glued 1 wing on to the body and used a pop dot the attach the other. The wing on top was outlined with icicle stickles and I also put a little on the body.

The green strip is a shadows layer from Elegant edges. I took 2 images cut at .75 x 4.25, welded them together and filled it with green. I then ran it through my cuttlebug using swiss dots. It was cut to match the size of the patterned paper

For the bow I used a 1" white organza ribbon and used a glue gun to attach it.

If you would like the CCR file, click here

Sunday, March 4, 2012

It's been quite awhile...

since I've posted anything. I thought It's time post something new. I made this card for my grandson's 4th birthday yesterday.


I used Cricut Craft Room and my Imagine. Lightening McQueen is cut at 2 inches. I used Narelle's method again to print and cut all in one layer. There is no need to cut out the tire layers since they are black and the bottom layer is black. For the red, yellow, orange, white , and black I used the colors that are already built into CCR. The exhaust pipe is a gray from the JT cartridge. The inside of the wheel is a brown from Better Together. , I used RGB codes 164-177-207 for the windows , 115-150-201 for the eyes, and 163-57-4 for under the Rustees letters. Kachow is cut at 1" and the colors are the same as used on McQueen. I used the computer for "It's your Birthday" I used the Arial Bold font printed at 11pt. I mounted McQueen with 3D gluedots and my tape runner for the saying and Kachow.

Monday, October 10, 2011

My blog hop winners are......

Day 1 - craftaholic from http://ibecircled.blogspot.com/  DCWV Blossom Song stack

Day 2 - Patrica from More Fun than Therapy  DCWV French Country Stack

Congrats ladies. Just let me know where to send them.

I want to thank everyone that stopeped by for your wonderful comments. My first blog hop was so much fun.

Sunday, October 9, 2011

Welcome


To the second day of the blog hop. If you got here from txscrappermom then you're in the right place. My theme is still Halloween. Leave a comment by Oct 10th and you will be entered into the drawing for a 12x12 DCWV stack.

Today I have a card, a candy box, and a plaque.


Here is the gypsy file for this card. I stamped the orange card with a background stamp from Northwood Rubber Stamps. I used the Tiny Bubbles embossing folder with my Cuttlebug to add texture to the black strip. The Cricut cuts are from Pumpkin Carving, Mini Monograms, and Plantin Schoolbook. For the spider I used a glittered fun foam one I picked up at the store. For the greeting I used the Word Window punch and word set from Stampin Up. The saying is attached with brads and I added ribbon on the top.

This is just a fun candy box. I made these for my grandchildren to give out at school. For this box I used    Wedding, George and Basic Shapes, Mini Monograms, and Paper Doll  Dress Up gypsy file). For the pillow box, I used the hide/contour to hide the cut out window. I also customized the size of the box so it was just the right size for a snack size bad of M&Ms. I held the black strip and pillow box  together with Terrifically Tacky Tape. In hind site I would use a Cuttlebug embossing folder to give the strip some texture. I glued the wiggly eyes on before I attached the bat. The bat is held on using a dimensional glue dot.


For this project I used A Child's Year and Stamped. I bought a decorative metal sign and spray painted it orange. The flat area on the sign is 5x18. I used the 12x24 mat so I could put it on all at once. The witches are cut at 3.5" with on flipped. the CAUTION letters are 2.10" and witch crossing is cut a 1.5". All images are cut out of  Oracal 631 vinyl. I know that most people cut it at 3 3 3 but in the class I took and in the PC box of vinyl it has 6 for the blade depth and 2 for the pressure. Based on how intricate the design, I adjust the speed although with the gypsy, I have no control over that. This is a pretty simple sign but here is the gypsy file if you would like it.

The rest of these pictures are decorations I cut from vinyl to decorate my house.
Side light

Front door


.
Bathroom

Bathroom
Front window

Thanks for stopping by. The next stop on the hop is blingdazzler.

Saturday, October 8, 2011

Welcome to the Hop

Welcome to my first ever blog hop! If you arrived from Blingdazzler you are in the right place. I decided to use Halloween as my theme. Today I'm focusing on wearables. Leave a comment by Oct 9th will be entered into the drawing for a 12x12 DCWV stack.

I made these shirts for my grandchildren using heat set vinyl and Pumpkin Carving.


I added bling to the eyes of my granddaughter's. These are simple cuts but if you are interested in the gypsy file, click here

The next shirt was inspired by a shirt I saw at Kmart. I thought it was funny so i couldn't resist making my own.


None of these images were made with the Cricut but I did use my Yudu. All the images I found online. The font used is called Liquidism part 2 regular. Because my printer only does 8.5 x 11 and the emulsion sheets are bigger, I printed out the hat by itself and then cut around it and taped it on the left side on top of the saying making sure it all fits the width of the emulsion.


 I decided to to also use glitter, so I burned another screen on the 70 mesh screen.
I made sure to line up the words from both screens before they were burned. First I used the black ink. I allowed the ink to dry. Then using the 70 mesh screen I pulled the glue through and then sprinkled with glitter. I found the Yudu glue to be really thick. I watered it down but I think it could have been watered down more. I used the Yudu glitter. I allowed glue to dry, shook off excess glitter and heat set 4 minutes on both sides using high heat. Make sure to use a press cloth. I used my I-rock to add the studs around the neck and sleeves. If you would like the PDF, let me know.  

My last project is a onsie I made for my grandson.


I again used my Yudu. I used the same font as my last shirt and the bats I found online too. I used glow in the dark ink.

This was the best picture I could get with my camera so you have to look hard. Below is the jpg for the onsie.

Thanks for stopping by. Your next stop is txscrappermom.

Friday, October 7, 2011

Blop Hop

Don't forget to join me for my first ever blop hop. I'm particpating with some very talented ladies. Tomorrow my posts will be on Halloween wearables and on Sunday cards and decor.

Wednesday, October 5, 2011

Machine embroidery

I bought an embroidery machine when I was at the State Fair. I have been drooling for years. I came across some real cute designs on Embroidery Library and decided to give it a try. I had seen some cute Halloween bibs at the store so I decided to try it myself. Here is the result.


I have since learned that I should have put water soluable stabilizer on the top to hold down the terry cloth loops. Doing embroidery is so much fun